Best Homemade Slime Recipe
What is Homemade Slime and Why Make It at Home?
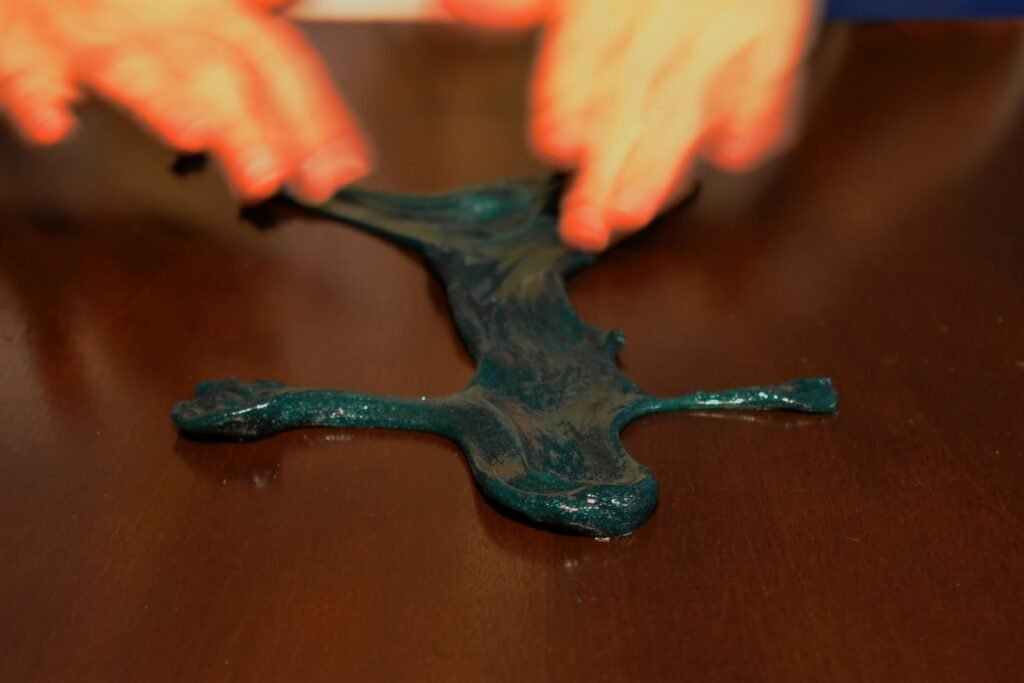
Homemade slime is a popular, playful substance characterized by its stretchy and gooey texture, which captures the interest of individuals across various age groups. It is primarily composed of basic household ingredients such as glue, borax or contact lens solution, and water, creating a viscoelastic material that can be manipulated in various ways. The versatility of slime allows for numerous variations, including fluffy slime, glitter slime, and even edible slime, making it a favored activity among children and adults alike.
The creation of homemade slime offers multiple benefits, particularly in terms of educational value and sensory experience. While making slime, individuals engage in hands-on learning about chemical reactions and the properties of different materials. This interactive process not only enhances understanding of basic scientific concepts but also ignites creativity, as individuals can customize their slime with colors, scents, and textures. Furthermore, the tactile nature of slime can provide a calming effect, making it a useful tool for stress relief and sensory play.
The popularity of homemade slime has surged in recent years, spurred by social media trends and videos demonstrating various slime-making techniques. This surge has established slime as a communal activity, often shared within family settings or among friends, thus strengthening interpersonal connections. Moreover, making slime at home is often more economical compared to purchasing pre-made alternatives, allowing for greater experimentation with different recipes and ingredients.
In sum, homemade slime encompasses a simple yet captivating experience that contributes to both fun and learning. It serves as a unique blend of entertainment and education, engaging individuals in the arts of science and creativity while fostering social interactions.
Why You’ll Love This Homemade Slime Recipe
The homemade slime recipe featured in this guide has been tailored for both enjoyment and ease of use. One of the standout qualities of this particular recipe is the exceptional texture it creates. This slime strikes the perfect balance between being pliable and firm, allowing for a satisfying tactile experience. When stretched, it provides a delightful elasticity that can entertain both children and adults alike.
Not only is this slime fun to manipulate, but its simplicity makes it accessible for everyone, regardless of prior crafting experience. The ingredients required are common household items, making it easy to encourage creativity right at home. Moreover, the clear instructions help streamline the process, transforming a potentially messy activity into a systematic fun experience. A few easy steps are all it takes to produce a batch of slime that captivates and delights.
Beyond the basic recipe, there is a world of customization available. You can easily modify the colors, scents, and even add textures to create unique slime variations that cater to personal preferences. For example, adding food coloring can give the slime a vibrant hue, while incorporating glitter or foam beads can enhance its visual appeal and create interesting sensory experiences. The possibilities for customization are truly endless, providing an opportunity to engage with the craft and explore different creative avenues.
Furthermore, this recipe encourages experimentation, which can lead to exciting discoveries and variations. Whether you are looking to create a neon glow-in-the-dark slime for a party or a calming pastel version for sensory play, this homemade slime recipe provides an engaging platform for creativity and exploration.
Ingredients You’ll Need
When embarking on the exciting venture of making homemade slime, it is essential to gather the right ingredients. The primary components necessary for slime include the following:
1. Glue: The foundation of your slime, white school glue or clear glue, is essential for creating the slime’s base. Glue contains polyvinyl acetate, which allows it to become stretchy when combined with other ingredients. You can find glue at most craft stores or online. Variations such as glitter glue can provide added fun and effects.
2. Activator: The activator is crucial for transforming the glue mixture into slime. Common activators include borax solution, contact lens solution, or baking soda combined with saline solution. Each option has its unique properties, so you may want to experiment to find your preferred consistency. Borax can be found at grocery stores or online, while saline solutions are often available at pharmacies.
3. Water: Water is typically mixed with glue and is critical in achieving the desired texture. It helps in thinning the glue to a more manageable consistency. Regular tap water will suffice for this purpose.
4. Optional Additives: To customize your slime, consider adding food coloring, glitter, or foam beads. These additives enhance the visual appeal and texture. Food coloring, available at grocery stores, allows for various color combinations, while glitter can often be sourced from craft sections.
Additionally, if you find yourself missing an ingredient, there are substitutes available. For instance, liquid starch can be used as an alternative to borax. The flexibility in ingredients allows for creative exploration while promoting the fun in slime-making.
How to Make Slime at Home: Step-by-Step Instructions
Creating homemade slime is both a fun and educational activity, ideal for various age groups. Below is a step-by-step guide that outlines the process of making slime from simple ingredients. The primary components typically include glue, activator, and optional additives like food coloring or glitter. By following these instructions closely, you can achieve a satisfying slime consistency.
The first step is to gather your materials. You will need white school glue (about 1 cup), a bowl for mixing, an activator such as borax solution or contact lens solution, and optional items like food coloring or shaving cream for variations. Begin by pouring the glue into the mixing bowl. If you desire a colored slime, add a few drops of food coloring into the glue and mix thoroughly until you achieve the desired hue.
Next, prepare the activator. If you are using borax, dissolve 1 teaspoon of borax in 1 cup of warm water. Make sure it is fully dissolved before proceeding. Gradually introduce the activator to the glue mixture, stirring continuously. For the best outcome, add the activator slowly—about a tablespoon at a time. You will notice the glue starting to clump together and pull away from the sides of the bowl, which is a sign that your slime is starting to form.
Once you have added enough activator, knead the slime with your hands for optimal texture. It may be sticky at first, but continue to work with it until it reaches a more pliable consistency. If your slime remains too runny, you can add more activator to achieve your preferred thickness. Be cautious not to overactivate, as this can make the slime stiff and less stretchy.
Lastly, store your homemade slime in an airtight container to keep it fresh for multiple uses, avoiding any air exposure. Enjoy your creation, and consider experimenting with different textures and colors to refine your slime-making skills.
Fun Variations of Slime to Try
Slime-making has evolved into a delightful craft that allows for endless creativity. While the basic slime recipe serves as a reliable foundation, introducing variations can significantly enhance the fun and tactile experience. Here are some exciting types of slime you can create, along with simple recipes for each.
Glitter Slime is a mesmerizing twist on traditional slime. To make this, simply mix one cup of clear school glue with one tablespoon of contact lens solution, and then add two tablespoons of baking soda. Finally, stir in a liberal amount of fine glitter. The glitter catches the light beautifully, making this slime not only enjoyable to play with but also visually appealing.
Fluffy Slime offers a light and airy texture that is highly satisfying. To craft fluffy slime, start with one cup of white school glue and mix in five cups of shaving cream. Incorporate one tablespoon of contact lens solution and a tablespoon of baking soda to achieve the right consistency. The result is a soft, pillowy slime that expands when whipped, creating a gentle bounce.
If you are interested in edible slime, you will find several delightful recipes. One simple version involves mixing one cup of powdered sugar with a cup of corn syrup and a bit of cornstarch to thicken the mixture. This edible treat provides a fun and safe alternative for younger children who may be tempted to taste their creations.
Other inventive variations include glow-in-the-dark slime, scented slime, and even magnetic slime. Each of these can be made by adding specific ingredients or utilizing different glue types. The joy of creating these unique slimes lies in the experimentation process, encouraging both creativity and sensory exploration among participants.
Safety Tips for Making and Playing with Slime
Creating and enjoying homemade slime can be a delightful experience for both children and adults. However, it is vital to prioritize safety while working with the various ingredients and tools involved in the slime-making process. Here, we outline essential safety tips to ensure a fun yet secure environment.
First and foremost, always supervise children during the slime-making activity. Even though most slime recipes utilize common household ingredients, some can pose risks if ingested. Therefore, it is crucial to explain to children that slime is not food and should not be tasted. This understanding aids in fostering safe play.
When gathering materials, opt for non-toxic ingredients when possible. Check labels for warnings or age recommendations and avoid any supplies that could cause allergic reactions or irritation. For example, borax can be used in various slime recipes; however, it is essential to handle it with care. Ensure that children do not touch their face or mouth while working with substances like borax, as this can lead to unwanted ingestion. Instead, use gloves where applicable and set clear boundaries for handling these materials.
Proper clean-up is also a crucial step in the slime-making process. After creating slime, make sure to clean all surfaces and utensils meticulously. This step eliminates any leftover residue that might be hazardous if touched or ingested. Additionally, instruct children to wash their hands thoroughly after playing with slime to prevent any potential reactions from allergens.
Incorporating these safety tips into your slime-making sessions can greatly enhance the experience, ensuring that it remains enjoyable and stress-free. Remember that safety should always come first, allowing for creative exploration without the added worry.
Creative Ways to Play with Slime
Engaging with homemade slime offers a multitude of creative and educational opportunities for all ages. One popular activity is sensory play, where individuals interact with slime to explore different textures and properties. For younger children, adding small toys or figurines into the slime can enhance the experience, encouraging imaginative play and fine motor skills. This type of sensory activity is not only enjoyable but also helps in developing cognitive and tactile abilities.
In addition to sensory play, homemade slime can be utilized for scientific experiments. For example, you can explore the concept of viscosity by creating different slime recipes with variations in ingredients. Experimenting with the water-to-adhesive ratio can lead to slime that is either stretchy or gooey, providing a fun and informative hands-on experience for both kids and adults. This kind of experimentation nurtures curiosity while teaching fundamental scientific principles.
Crafting with slime presents another exciting avenue for creativity. One innovative project is making slime art; participants can use different colors of slime to create vibrant designs or patterns on paper. Additionally, using glitter or small beads within the slime can transform a simple project into a dazzling masterpiece. These activities not only facilitate artistic expression but also promote collaboration when done in groups, fostering social skills and teamwork.
Finally, consider organizing a slime-themed game day, where friends or family can compete in fun challenges such as slime tossing or creating the longest slime strand. Such playful competitions encourage active participation and reinforce the joy of working together. By discovering various ways to play with homemade slime, individuals can enhance their sensory experience, scientific understanding, and artistic expression, making it an engaging and versatile material for all ages.
How to Store Homemade Slime
Storing homemade slime correctly is essential for maintaining its texture and longevity. Proper storage can help prevent it from drying out or becoming overly sticky, ensuring that it remains fun to play with over time. The first step in storing your slime is to choose an appropriate container. Ideally, a sealed plastic or glass container is recommended. Using an airtight container will help retain moisture and keep the slime fresh. For smaller batches, consider using resealable plastic bags, ensuring all the air is removed before sealing.
The ideal storage condition for homemade slime is a cool, dry place, away from direct sunlight. Sunlight can cause slime to heat up, leading to undesirable changes in texture. A temperature range of 60°F to 75°F (15°C to 24°C) is suitable for slime storage. Additionally, avoid leaving your slime in environments with extreme temperatures, such as a hot car, which can adversely affect its quality.
When it comes to preventing your slime from drying out, consider adding a few drops of water or lotion to restore its moisture if you notice it becoming stiff. If slime becomes too sticky, a small amount of cornstarch or more slime activator can be added to improve its texture. After playing with your slime, always ensure it is clean, free from any debris, and completely sealed before placing it back into storage. By adhering to these simple guidelines, you can enjoy your homemade slime for an extended period, maintaining its desired consistency and fun appeal.
Easy Clean-Up After Slime Fun
Engaging in a slime-making session can be an enjoyable and educational experience, but it is essential to plan for the inevitable clean-up. Implementing strategies to prevent messes during the process can significantly ease the post-slime activity clean-up efforts. First, it is advisable to designate a specific area for slime-making, ideally a smooth surface that can withstand spills. Utilizing a waterproof tablecloth or a large plastic sheet can be particularly effective. Moreover, having a few trays or shallow containers handy can help contain the slime ingredients and minimize spills.
If a slime accident does occur, addressing it quickly will mitigate potential damage and make clean-up easier. For water-based slime, a simple solution of soap and warm water can be used to clean surfaces like countertops and floors. A cloth or sponge should be moistened with the soapy mixture to wipe away any slime remnants. For carpet or fabric, it is recommended to gently scrape off as much slime as possible and then use cold water to dampen the area. A mixture of white vinegar and water can be applied to eliminate sticky residue.
For surfaces such as glass or metal, rubbing alcohol can be an effective way to remove any dried slime without leaving stains. However, care should be taken to check the manufacturer’s instructions for specific materials prior to application to avoid adverse reactions. To minimize post-activity clean-up, it is also helpful to wear aprons and encourage children to work with slime over designated surfaces. Utilizing small containers for collecting any leftover ingredients can facilitate a seamless transition into the clean-up phase. By using these efficient techniques and cleaning products, the enjoyment of slime-making can continue without the dread of prolonged scrub sessions afterward.

We create powerful, insightful content that fuels the minds of entrepreneurs and business owners, inspiring them to innovate, grow, and succeed.